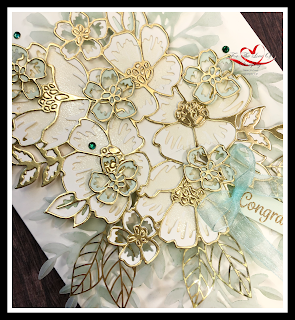
Welcome to the July Ink-Stamp-Share Monthly blog hop. This months theme is "Other Celebration" (but Birthday). So, I have designed a Wedding card. Unfortunately, I don't know anyone getting married right now, so, I will tuck this one away until the occasion comes.
I have moved away from the traditional card size of 5 1/2" x 4 1/4" and designed a "full size" card and by that I mean I have taken an 8-1/2" x 11" and folded it in half to 5-1/2" x 8-1/2". This gives me twice the surface size to design on. And the Many Layered Blossoms dies are perfect for this size of card. With such a large die cut it's screaming to be shown off to its fullest!
In my mind, when designing this card, I envisioned a wedding bouquet and I wanted to use a soft color pallet. So, I have chosen Very Vanilla, Soft Sea Foam and gold for my card. Here are the steps to make this card.
To create the bouquet,
- Stamp the large floral spray from Blossoms in Bloom bundle (to make the bouquet) in Versamark and heat embossed it with clear embossing powder.
- Fussy cut the image such that it will hide behind the 2 die cuts (next step) that will be layered over top.
- Use the 2 different dies from the Many Layered Blossoms
- Next, die cut 8 of the small flower outlines in gold and 5 of the inset in Soft Sea Foam.
- Adhere the 5 Sea Foam pieces to the matching gold pieces and place a mini dimensional on the back of each of them and then adhered on top of the "bouquet" as shown.
- For a pop of color, used the dark Mint Macaron Stampin' Blends marker and color over the surface of some vellum card stock. Then run through your die cutting machine with various dies from Forever Flourishing.
- Start with the Mint Macaron vellum pieces on the card front - arrange the vellum pieces on the card and place the bouquet over top to judge the placement of the vellum. Adhere the vellum to the card front.
- Add the 3 gold foil pieces (from Forever Gold laser cut paper) on the bottom ferns as shown above.
- Adhere the bouquet with the new foam adhesive sheets (it is a bit thicker than the dimensionals and I wanted the bouquet raised up higher) to the card front.
- Stamp the greeting ("Here's a Card" stamp set used on my card) in Versamark and emboss with gold embossing powder.
- Tuck in under the bottom right corner of the bouquet.
- Adhere the 3 remaining gold foil flowers,as shown, with glue dots, a few rhinestones (I used the Holiday rhinestone jewels) and a bow (Pool Party 3/8" sheer ribbon) to the card.
Would you like to recreate this card? Click here to view & order the supplies that you will need.
I hope that I have inspired you with my "full-size" Wedding bouquet card. Please be sure to hop onto the next blog for more creative ideas. Thanks for stopping by!
Roll Call


Beautiful card x
ReplyDeleteWould love this card, absolutely gorgeous
ReplyDeleteGorgeous Card!!!
ReplyDeleteWhat a wow card!
ReplyDeleteBeautiful card Tracie I love all the layers and textures. Thank you for sharing and hopping with us x
ReplyDeleteSo beautiful
ReplyDeleteWow ! This card is absolutely stunning ! Do you mind if I case it ? My friend is having her 40 th Wedding Anniversary in a couple of weeks and she’d so love this card !
ReplyDeleteStampin' Up! DemonstratorJuly 25, 2020
Cheryl Algie: I am absolutely fine with you casing my card!
ReplyDeleteTracie
Stunning, I love it, just perfect x
ReplyDeleteWOWSERS!!! Beautiful card really special, thank you for hopping with us this month
ReplyDeleteWow, really lovely card :-)
ReplyDeleteBeautiful card. So elegant and romantic.
ReplyDeleteBeautiful card Tracie. Love the addition of vellum and extra leaves.
ReplyDeleteThis is such a beautiful way to use this set. I'm not all that keen on the bright colours that some are using, so will stick to neutrals at least for now. The perfect card.
ReplyDeleteWonderful card! I think this is the best example I have seen using the blossoms bundle. Beautiful!
ReplyDeleteStampin' Up! DemonstratorJune 12, 2022
Thank you so much.
Delete