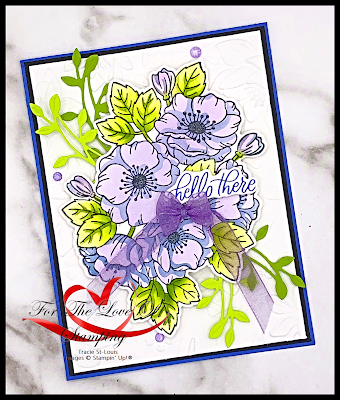
Swing & Sway Card Technique

I absolutely love interactive cards. Check out my latest one. It is a Swing & Sway card featuring Thoughtful Expressions and the beautiful Flowering Zinnias DSP.

For this card I dusted off my water colour pencils and glitzed the hummingbird up with Wink of Stella.


Easter Bonnet Rocker Card

So imagine my surprise when I realized that Easter is the last week of March this year! Only 2 weeks away and I hadn't made any Easter cards!  Now for some time I have been wanting to create a rocker card but it wasn't until I saw this technique demonstrated by Claire Ottaway that I finally made one!  It is the perfect card for Easter and I can't wait to send it out.  

Easter Bonnet Rocker Card

To make this fun rocker card you will need:
  • Deckled Circle Dies
  • Embossing folder - for the texture - Stippled is used here
  • Paper Florist Dies
  • Oval Punch
  • 2022 - 2024 Pearls
  • Ribbon - 3/8" Grosgrain used here

Have a happy Easter

Hugs Tracie


Thoughtful Expressions Bright & Beautiful

My oh my!  Look how bright & beautiful the Flowering Zinnia DSP is! These colourful flowers have the attention of this bright & beautiful Hummingbird!

I have created this stunning Hummingbird using Thoughtful Expressions bundle and Water Colour Pencils!  It has been "a minute" since I used these pencils and love how you can create magical colours by mixing them together!

When was the last time you used your Water Colour Pencils?

Flowering Zinnias

Happy stamping!
Hugs, Tracie


Thoughtful Expressions Framed Art

Create a focal point by keeping the background colour light and stamped images in the forefront in bright cheerful colours.

Featured products:

Thoughtful Expressions bundle; Stitched Rectangle dies; Gorgeous Garden dies; Delightful Florals DSP; Water Colour Pencils.


Happy stamping!

Leave me a comment below ~ I would love to here your thoughts!

Hugs, Tracie


Decorate Both Sides - Accordion Fold

Do you have a favorite fancy fold card type that you love?  I have so many and I love it when I find a new one! Here is a fun take on an accordion style card that I saw on a blog post from Maria José Vargas. 

Accordian Fold

The card features designer series paper on both sides of the fold. Why didn't I think of that? What I have learned over the years as a Stampin' Up! demo is that there I will always find new & surprising ways of doing things.

With all the layers of paper, I found that the card wouldn't stay closed so I created a belly band to hold the card together. The Thoughtful Expression dies are TO DIE FOR!!   WOW the scalloped edges give these dies such an elegant look and when combined with the Flight and Airy DSP it is magical! So soft and dainty!

The base of the card measures 11" x 5 1/2" and the scoring is at 1 1/2", 3 1/2" 6 3/4". The rest is just layering cardstock.

Happy stamping!

Leave me a comment below ~ I would love to here your thoughts!

Hugs, Tracie


Making The Texture Pop

 Depth and texture can be easily achieved by blending ink over the surface. Look at the detail that pops on the Softly Sophisticated embossed image! Using 2 colours and overlapping them gives you a whole new colour!  Here I blended Tahitian Tide and Orchid Oasis to make a pretty darker purple - love it!  Try it out - you will be amazed with the various results you will get!


Try using a single colour like I have here on this card. I used the same embossing folder and added Calypso Coral - so pretty.


Happy stamping!

Hugs, Tracie
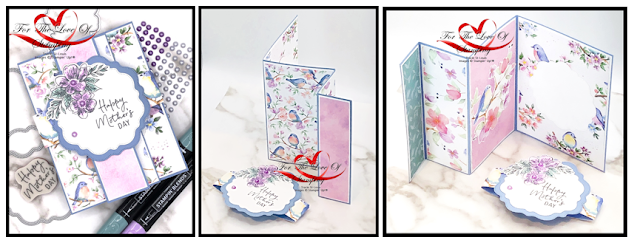


Perennial Lavender Explosion Card

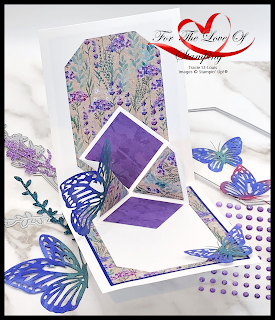
 Hey Friends! Welcome to my paper crafting blog. I have a fun fold card to share with you today using Perennial Lavender DSP. Such pretty designer series paper from Stampin' Up!  Sometimes I think it is too pretty to cut but I bit the bullet and dove in.

Perennial Lavender
An explosion card is a 3D style card. When you open the card a little surprise pop out appears. Once you get the hang of the the pop out the rest is easy-peasy.

The front of my card features a new item from the Jan - April mini SU catalogue - the Paper Butterflies. They come white which allows you to colour them with any medium you wish - ink, markers etc. 

There are also some pretty glimmer paper sprays of leaves in Pretty Peacock and Gorgeous Grape. 

And finally the gorgeous Perennial Lavender DSP.

Inside you will see more of the paper butterflies, the Perennial Lavender DSP and of course the pop-out. Check out the fun frame I created with the DSP layered on Starry Sky cardstock. The colours are so pretty!

Perennial Lavender

Happy stamping!

Hugs, Tracie


Fluffiest Friends Meets Hooray For Surprises

Fluffiest Friends
Hello and welcome! Today is another quick share project using Fluffiest Friends & Hooray For Surprises bundles.

With the chilly days here in Ottawa, Ont. Canada, I needed to remind myself that spring isn't "too" far away so why not get into the spirit and make something bright and cheery!

2 great bundles bring this cut card together.  Fluffiest Friends is available in the Online Exclusives - such an adorable set of cute and fluffy critters. Hooray for Surprises is available through the Jan - April 2024 mini catalogue (page 13).  How great is it to be able to mix and match bundles to create something fun like this card. 

Colours used on my card:

  • Parakeet Party
  • Azure Afternoon
  • Lemon Lolly
  • White
Stampin' Blends used for colouring

  • Azure Afternoon
  • Lemon Lolly
  • Crumb Cake
I hope you like today's bright and cheery Birthday card!

Happy stamping.

Hugs, Tracie


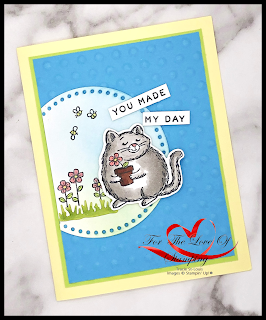
Fluffiest Friends - You Made My Day

Fluffiest Friends
 Hey friend!  Thanks for stopping by! Today I have a quick post to
show you. This cute card features the Fluffiest Friends bundle that is featured in the Online Exclusives.  

With the cold winter days I thought it would be great to make something bright and cheery. What better way that to use bright colours like Lemon Lolly, Parakeet Party and Tahitian Tide! 

This little kitty was coloured with Stampin' Blends and adhered to a partial circle which I used Everyday Details dies

Happy stamping!

Hugs, Tracie


Flight & Airy

Sale-A-Bration has begun and one of the prettiest DSP that I have seen from Stampin' Up! in a
while is the
Flight & Airy. Such pretty colours and designs. You may recall the calendar that I posted here last month featuring this paper. Today I have fussy cut one of the birds and centered it on vellum which I embossed with the Layered Floral 3D embossing folder (new in the Jan to April Mini). What do you think?

The base colour is Lemon Lolly. Under the embossed vellum (Layered Florals 3D EF) is a 2 1/2" Petal Pink circle. Love the softness this gives to the card.

The branch was die cut from Around the Bend in Soft Seafoam and the bird was fussy cut from the Flight & Airy DSP (FREE with a net $60 between Jan & Feb 2024). The final touch is the tiny bow made from Sheer Ribbon combo pack.

This card makes me anxious for spring, especially given the nasty snow storm we got here in Ottawa, Ont. last night!!!

Happy Stamping! Check out the products I used on my card here.

Hugs, Tracie


Mix & Mask - Enduring Beauty Bundle

 Well I have to say that I am happy to see Stampin' Up! has released a layered masking bundle. Layering masks have been on the market for at least 2 years now. It is great to see that Stampin' Up has bundled the masks with the coordinating stamps and dies.

Enduring Beauty Layering Stencils
Layering stencils are easy to use. Start by stamping the image and then layer each stencil, one at a time, over the stamped image and ink blend your colours.

I started with Highland Heather blending very lightly. Then I removed the 1st stencil and place the 2nd over the image and ink blended with Boho Blue. How pretty is the blended colour? With the 2nd stencil still in place I then overlayed some additional Highland Heather. So pretty.

There is a 3rd "flower layer" stencil that adds additional layers to the center but I chose not to use it as I love it the way it is. 

The leaves are ink blended with 2 stencils and 2 colours. I started with Parakeet Party and then moved to the 2nd stencil with Granny Apple Green.

Also on this card I have used a new embossing folder - Layered Florals 3D - this is the white layer. And then finished the card with some new Purple Fine Shimmer gems.

See all the products here.

Happy stamping.

Hugs, Tracie  


Fluffiest Friends - Have a "dam" good birthday

Hello friends! Happy 2024! 

Today's post is featuring Fluffiest Friends (Online Exclusives). This stamp set is sold with an set of coordinating dies, making it easy to cut out the critters. I chose to use the beaver from the bundle and show you how to use some of the other dies in the bundle to create a background.

Fluffiest Friends
I used the branch die from the bundle to make the dam that is behind the beaver. Yes, there is a stamp in the bundle of a pile of branches but I wanted something more realistic. 

In the dies there are some leaves. I chose to use them to make water lilies by die cutting one of the larger and one of the small leaves and 
adhering them next to each other. Believe it or not, the flower is the bud from the bough punch! Both the leaves and the flower have a touch of Wink of Stella.
Happy stamping!
Hugs, Tracie


Layered Floral Emboss & Blend Technique

Hello friends! Well now that Christmas is over it's time to get started on my 2024 card projects. 

Layered Floral 3D Embossing Folder
Starting Jan. 4, 2024, a new mini catalogue will be available. In it there are so many new products!

Today I am featuring a few of them all on 1 card. One of my favourite items  is the Layered Floral 3D embossing folder. This folder has so much depth to it. I wanted to show you up close how detailed it truly is. Check it out!

There are a few different ways you can use this 3D EF. 

First, use it as is. It will make a beautiful backdrop for any card project.

Second, add ink to the folder before you run it through your embossing machine.

Layered Floral 3D Embossing Folder
Three, add ink to the raised portions of the embossed paper like I have done on my project.

So there is a lot going on with my card. I started with a Bubble Bath card base and added a layer of Highland Heather. I ran the white layer through my embossing machine and then used blending brushes to add the various colours (Bubble Bath, Fresh Freesia, Highland Heather, Parakeet Party & Granny Apple Green). 
I then blended the colors with a clear Wink of Stella to give each flower and leaf sparkle.
I die cut the purple glimmer paper (part of the Three Colour Glimmer paper pack) with the circles from the Everyday Detail dies.
Using the same technique of embossing and ink blending I used another new 3D embossing folder bundle for the sentiment - Thoughtful Moments Hybrid EF. This new product bundle  features an 3D EF along with a die that allows your to create your sentiments (embossed) and die cut them at the same time. Once the sentiment was embossed and die cut I used a brayer (I can't remember the last time I used a brayer) to add the colour to the surface of the sentiment to make it pop.
Finally I embossed, ink blended and fussy cut one of the flowers from the Layered Floral 3D EF and added it along side of the sentiment & tied a tiny bow using Bubble Bath sheer ribbon
I hope you enjoyed today's project. Stay tuned for more to come!
Happy stamping,
Hugs, Tracie


Tic Tac Stocking Stuffers

Tic Tac Stocking Stuffers
Looking for a stocking stuffer idea or perhaps a little treat to give to a friend, the delivery person, colleague or coworker? Wrap up a packet of Tic Tacs in some designer series paper, add a tag and some ribbon & voila! Instant & easy gift.

Merry Christmas!

Hugs, 

Tracie